At first, I was skeptical of cutting or fixing light strips because they are fragile, and any mistake can render them useless.
However, after watching hundreds of videos and cutting a few lights myself, I have picked up some tips and tricks. Therefore, below will be everything I learned, YouTube videos that were useful, and some additional questions about altering your light strips.
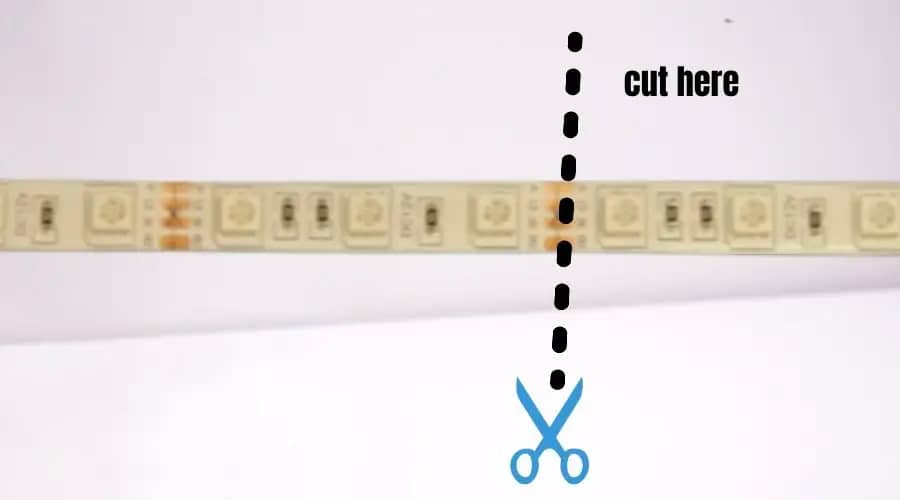
When cutting light strips, find the nearest copper points after determining the desired length. Try to cut the center of the points, as this is the safest way to go. However, this technique carries a risk, as there is a possibility of cutting too much on one side.
On the other hand, if there is not enough copper, there will be poor contact. Another option is to cut off the copper tip where a lot of it is visible (right at the edge). This is an excellent option if there are only a few strips at the end, as the rest will be useless.
After the strips are cut, peel off some adhesives near the spot to make it easier to work with. When I cut one of my strips, I always use connectors. The trick with connectors is to first count how many copper dots are on your strips and buy the connectors with the exact amount.
Also, make sure you connect them on the correct side to avoid confusion.
Can You Cut LED Strips And Secure Cut LED Strips?
Yes, follow the guide below.
- Look for the copper point.
- With scissors cut in the middle of the edge.
- Determine the top of the connector
- Peel back the adhesive near the cut area.
- Insert the strip in the connector.
- Secure and test your lights.
Can You Cut LED Strips Anywhere?
No, only cut on the copper points; it is the safest way. Let’s explore the reason for copper points:
Copper points are important because they help consumers cut or extend light strips when necessary. They comprise resistors that have all the components to power each LED. These points are marked, so when you trim the strips, the upstream LEDs continue to access power.
Therefore, if you cut your strips anywhere, there is a high risk of damaging the circuit board and its components. The result of this is the LEDs would not get enough power for them to light.
If you have cut in a random spot, then you’ll need to attach a new wire lead and a power conductor to the cut end.
How To Connect LED Strips Without Connectors?
I have always used connectors after cutting my LED strips. But if you can’t and can solder, then here’s a video that can help.
How To Connect Multiple Led Strip Lights?
We have all bought LED strips that were way too short for the areas they were supposed to be installed. I know I have made this mistake a few times.
In most cases, when connecting two strips, the male connectors are needed to make a connection. But on some occasions, you may need to cut the strips.
As mentioned above, ALWAYS CUT ON THE COPPER POINTS then remove the plastic to expose the dots and use a LED strip connector to align the two strips together for extra length.
Another option is to solder two strips to each intersection. You may want to solder on extra wires for stretches where there is no need for lights, but you want the line to continue.
These extra wires will be useful if the strips are installed between windows. When soldering, keep each wire separate. Also, connect the blue to blue and green to green, etc., or the strips will not work.
My second tip when connecting multiple led strips is- Make sure the buckle is secure and use a heat shrink cover to protect the connector.

Can You Cut Govee Led Strip Lights?
Yes, you can cut Govee light strips by cutting in the middle of the cutting mark. Then tear off the rubber coating to reveal the four pins and align the pins to a four-pin connector. Close the clips and power the strips, and test.
It’s that easy!
Problems That Can Occur When Cutting Strip Lights
A common problem that can occur after altering strip lights is cutting off too little of the copper points. When this happens, there is not enough copper for the connectors.
A simple solution is to cut again, on the points further up, as the ones below are no longer viable. If your lights do not work after cutting, then check to see if you have cut in the wrong place.
Always contact the LED manufacturer to make sure the light strips can be cut. Because if they can not be cut, then you have damaged your lights and need to buy a new set.
After the process of cutting and connecting points to connectors or soldering, check the lights to see if they work and change colors with no problems.
These extra steps eliminate the problem of sticking LEDs to a surface and then removing them because you did something wrong.
To Recap,
Do not panic! You can cut LED light strips at the copper points. I use scissors as they are easy to use, and I will not cut away too many of the dots on each side.
There are two ways to attach the light strips with connectors or soldering, but I prefer the connectors. It’s an extra expense but cheaper than new strips.
When soldering, practice with wires first before using them on the lights. If you are a pro, have fun soldering! Also, when connecting multiple strips, use Hippo connectors, which you can find on Amazon or at any hardware store.